
Showing posts with label recipe. Show all posts

Saturday, March 14, 2015

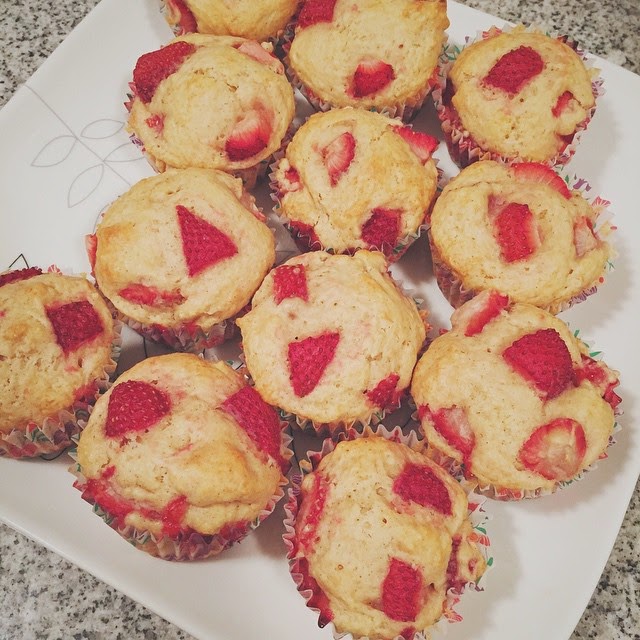
Strawberry Muffins

I recently bought some strawberries with no plans for them... and decided to make muffins!  Strawberries are a berry... and blueberry muffins are common and popular, right?


Strawberries are often cheaper than blueberries and the prices can often dip low, so this is a great recipe to keep handy.

I'll have to go check where my strawberries are from but CaliforniaStrawberries.com says shipments from the northern California areas begin in April, peak in May or June, and continue through November and that strawberries are also grown as an annual crop in California.


I do wonder why strawberry muffins aren't as common.  Maybe it's cause you have to put extra work into slicing the strawberries so blueberries are easier...?

I just googled recipes for strawberry aqua frescas and that's what you might be seeing next!  (It sounds super simple: strawberries, sugar, lime, water, ice and some mint sprigs!)  Last summer I made strawberry popsicles and they were a hit!  Guess I have lots of ideas for strawberries after all.  :)

----------------------------------------------------------------

Strawberry Muffins - adapted from All Recipes

1/4 cup canola oil
1/2 cup milk
1 egg
1/2 tsp vanilla
1 3/4 cups all-purpose flour
1/2 teaspoon salt
2 teaspoons baking powder
1/2 tsp cinnamon
1/4 cup brown sugar 
1/2 cup white sugar
1 cup chopped strawberries, plus a little more to press into the tops


Directions
Preheat oven to 375 degrees F, line muffin pan with paper liners.

In a small bowl, combine oil, milk, egg, and vanilla. Beat lightly. In a large bowl, mix flour, salt, baking powder, cinnamon, brown sugar, and white sugar. Toss in chopped strawberries and stir to coat with flour. Pour in milk mixture and stir together.

Fill muffin cups a little over 3/4. Take the "plus a little more" strawberries and press at least 3 small pieces into the the tops so that the red parts show.  (I like having my muffins speak for themselves what kind of muffins they are!)

Bake at 375 degrees F for 25 minutes.  Cool 10 minutes and remove from pans to cool on a plate (or a cookie rack).
----------------------------------------------------------------

What are your favorite kinds of muffins?  Have you had strawberry muffins before (since they don't seem as common?)

Thursday, March 12, 2015

Maple Snickerdoodle Cookies

Since people are requesting I SEND snickerdoddles... from the South Bay to Australia... I thought I'd just do a public service and post the recipe so y'all can make it!  You know...

"give a man a fish and you feed him for a day; teach a man to fish and you feed him for a lifetime" ~ English Proverb

Seriously guys, a LIFETIME of cookies.  Doesn't that sound like a much better deal?  :)  And while we're at it, we should all read If You Give a Mouse a Cookie!


This is my go-to Snickerdoodle recipe!  I realized I only have Kickerdoodles (snickerdoodles with a kick) on my blog, so I shall post these Maple Snickerdoodles!


-----------------------------------------------------------------------------

Maple Snickerdoodles by Lovin' from the Oven

  • 2 cups all-purpose flour
  • 1 1/2 tsp baking powder
  • 1/4 tsp baking soda
  • 1/2 tsp cream of tartar
  • 1 1/2 tsp ground cinnamon
  • 1/2 cup salted butter (or you can use unsalted and add about 1/4 tsp salt)
  • 1 cup granulated sugar
  • 3 tblsp real maple syrup
  • 1 egg
  • 3 parts sugar to 1 part cinnamon (this is the only thing I really changed.  I found that 2 parts sugar to 1 part cinnamon made them very dark and I think a lighter mix of cinnamon makes them prettier and less "burnt" looking)
Note: you will need to refrigerate the dough for at least an hour before baking!  I wanted to highlight this cause sometimes I don't read through the directions first and then find out I have to WAIT.  I also would recommend mixing everything in a plastic bowl, not metal, if you plan on refrigerating the dough in the bowl.  I usually like to put it in plastic/saran wrap into a little package before putting it in the fridge.  It seems to not dry out as much.  See below for a picture!

  1. In a medium bowl, sift together flour, baking powder, baking soda, cinnamon, cream of tartar, and salt.
  2. In a large bowl, cream the butter and 1 cup sugar until light and fluffy. Beat in the maple syrup and egg until combined. Add dry ingredients, stir until just mixed.
  3. Refrigerate dough for at least an hour.  I like to wrap it in plastic wrap instead of leaving it in the bowl.  See below for picture!
  4. Preheat oven to 350F.
  5. Roll dough into balls. Roll each ball in the sugar/cinnamon mixture. Arrange balls on cookie sheets, with space in between.  (I usually do 12 cookies to one cookie sheet.)
  6. Bake until tops are crackly, about 12 minutes. Remove from oven and leave cookies on sheets to cool slightly, about 2 minutes. Eat a few and then when they are all cooled, box 'em up!
Dough wrapped in plastic wrap before refrigerating for at least an hour.  Like a block of C4!  :oP
-----------------------------------------------------------------------------

Let me know if your cookies turn out wonderful!  What are your favorite flavor of cookies?
      

Saturday, February 23, 2013

Milk Chocolate Mousse

Chocolate mousse was my present to Tim this year. :) And some yellow tulips since he claimed prior that nobody's ever gotten him flowers before. :oP Now he can never say that again!


We love chocolate creme brulee but I didn't really want to go buy a torch kit and all (maybe someday!) so I decided to try one of our second favorites, chocolate mouse! Granted this isn't legit mousse at all and it's adapted from Pillsbury... it was tasty and super easy to make. It would probably be a great last-minute dessert idea if you have everything handy.


Milk Chocolate Mousse
1 1/2 cups skim milk
1/2 cup milk chocolate chips
1 box (4-serving size) chocolate instant pudding and pie filling mix
1 container (6 oz) vanilla yogurt
1 1/2 cups reduced-fat whipped topping
1 1/2 cups fresh strawberries

• In small saucepan, combine 1/4 cup of the milk and the chocolate chips. Cook over low heat, stirring constantly, until chocolate is completely melted and mixture is well blended.
• In medium bowl, combine remaining 1 1/4 cups milk and pudding mix. Beat with wire whisk for 1 to 2 minutes or until mixture is well blended and thickened; stir in yogurt.
• Blend melted chocolate into pudding mixture; fold in whipped topping. Spoon into individual dessert dishes. Top each serving with additional whipped topping and strawberries. Serve immediately or refrigerate until serving time. Store covered in refrigerator.

* Adding some crumbs of chocolate/Oreo cookie to the bottom of the dish or sprinkled on top would make it extra magical.

Adaptations:
1) The original recipe was for "Dark Chocolate Mousse" and called for dark chocolate chips, but I didn't have any, so I used milk chocolate chips.
2) It called for 1 container (6 oz) of Greek Fat Free honey vanilla yogurt, but I didn't read the "Greek" part when I was at the store so I bought regular yogurt and I couldn't find honey vanilla yogurt, so I went with regular vanilla yogurt.


I ended up using HAND WHIPPED cream because.... we had whipping cream, a whisk, and no mixer. :oP It was pretty hard work! It took quite a while and required Tim to help with his own dessert. :oP But hand whipped cream is an amazing thing when it starts to form peaks and stiffen. It's like... yeah, I made liquid into THAT. And then you have a whole new appreciation for churning butter and such. (One time we over whisked the cream and it turned into BUTTER. O_O)


For the chocolate mousse, I really liked it! It was not too sweet and nice and light. My only complaint is that it had kinda of a funny after taste, which I'm pretty sure is from the pudding mix (and I love chocolate pudding!) So... yeah, it's not "legit" mousse and I'm not quite sure whether the yogurt was necessary, but it was easy and tasty! :) I definitely want to try it with dark chocolate chips someday --- I think it will make it even better!

It made a pretty big batch and as I was bringing some over to Tim... it occured to me that some Oreo crumbs would be amazing! So I will probably add some to the leftovers. :)

Did you have a special Valentine's day dessert? Or what's your favorite dessert in general?
                                                         

Sunday, January 27, 2013

Blueberry Muffins

I made these a few weeks back and wanted to make more today BUT WE'RE LOW ON FLOUR.  How is that possible!

Anyway... these were definitely different from the Chocolate Chip Muffins!  Whilst the Chocolate Chip Muffins were more dry and scone-like, these Blueberry Muffins were super moist!  I thought these were more muffin-like, but Tim said he liked the Chocolate Chip Muffin-texture better.  I think this Blueberry Muffins recipe was less "healthy" because of the buttah and sour cream... but that was probably why it was so moist!  :)


Some organic blueberries!
 

All the dry ingredients together

The egg, sugar, butter, sour cream concoction!  It was super thick and smooth.


Pop 'em in the oven at 350 degrees.  I topped them off and they turned out fine.

All done!


Instagram-ed  :)

Blueberry Muffins
By Brown Eyed Baker

Ingredients:
2 cups all-purpose flour
 1 tablespoon baking powder
 ½ teaspoon salt
 1 egg
 1 cup granulated sugar
 4 tablespoons (2 ounces) unsalted butter, melted and cooled slightly
 1¼ cups sour cream
 1½ cups frozen or fresh blueberries

Directions:
1. Preheat the oven to 350 degrees F*. Line standard 12-cup muffin tin with paper liners and set aside.

2. Whisk the flour, baking powder and salt in a medium bowl until combined. Whisk the egg in a separate medium bowl until well-combined and light-colored, about 20 seconds. Add the sugar and whisk vigorously until thick, about 30 seconds. Add the melted butter in 2 or 3 additions, whisking to combine after each addition. Add the sour cream in 2 additions, whisking just to combine.

3. Add the berries to the dry ingredients and gently toss just to combine. Add the sour cream mixture and fold with a rubber spatula until the batter comes together and the berries are evenly distributed, 25 to 30 seconds. Small spots of flour may remain and the batter will be very thick. Do not overmix.

4. Using a large spoon or a cookie scoop sprayed with nonstick cooking spray, divide the batter amount the muffin cups. Bake until the muffins are light golden brown and a toothpick or thin knife inserted into the center of a muffin comes out clean, 25 to 30 minutes, rotating the pan from front to back halfway through the baking time. Immediately remove muffins to a wire rack and cool for at least 5 minutes. Serve immediately or at room temperature. Store leftovers in an airtight container at room temperature.


Can you SEE how moist they are? :D
They took a little more "work" than the other muffins I've made -- mainly because of the butter and sour cream part.  But they were super delicious!  You can taste the buttah.  haha.  I made these as a trial batch intended for my BFF new parents, but I haven't actually gotten around to making a second batch for them.  Maybe sometime this week!

What's your favorite blueberry muffin recipe?  Do you like 'em more dry and scone-like or more moist?
                                

Tuesday, January 15, 2013

Breakfast Casserole

So last week, we also dropped off a Breakfast Casserole for our new-parents friends!
 
(Source)
It's super easy to make and it's good for other occasions that involve a lot of people eating.  :)  It's a great Thanksgiving/Christmas morning thing.  It's a great out-of-town guest thing.  It's a one-pan wonder!


Breakfast Casserole
Recipe courtesy of new-mom herself, Katrina!
 
8 slices of bread, cut off crust, tear into pieces
1 pound bulk sausage
1 cup of shredded cheddar cheese
8 eggs
2 cups milk
 
- Preheat oven to 350 degrees
- Spray a 9x11 casserole dish
- Cook the sausage in frying pan, drain off ALL grease.  It helps to spread the sausage onto a paper towel while you prep the other ingrediants.
- Lay the pieces of bread out  on the bottom of the dish
- Then spread sausage on top of bread - top this with cheese
- Beat the eggs and milk together -- then pour evenly over top
- Cook at 350 degrees for 35 min or until a knife inserted in middle comes out clean
*It is best if you fix this the night before and put it in the fridge and cook it in the morning
 
You can also mix in other ingredients and goodies like mushrooms, bell peppers, bacon, etc.  This is also good for brunches and well, really any time of the day.  :)
 
What are your favorite breakfast dishes to cook for large groups of people?  Or breakfast dishes for new parents?
                                       

Friday, January 11, 2013

Japanese Brown Curry from a Box!

Continuing on the impromptu cooking for new parents series, on Wednesday, we dropped off more food for my BFF and her husband.

I made Japanese brown curry and rice, egg, sausage, and cheese casserole, more chocolate chip muffins, and some pastries from Bread of Life! (Packaged in environmentally unfriendly but so convinient plastic boxes). :) And I couldn't resist buying the mini cha-siu baos (BBQ buns).  They were so cute!

I ran around Oakland Chinatown looking for curry blocks (I went to at least four stores) and it seemed the only kind I could find was Golden Curry, in the small size. So I had to pick up two (which were kinda expensive!) for enough food for 4 people (plus leftovers).
 
 
Source
 
I usually use and like Vermont Curry. Tim is weirded by the advertised with a touch of apple and honey, but after trying Golden Curry, we both agreed Vermont Curry has a better flavor. :) You can usually find one or the other (or both!) at your local Asian supermarket.
 
Source
 
Japanese brown curry from a box is pretty easy! You just follow the directions on the box, and even then you just have to mostly get the measurements for water correct (and the rest is really kind of flexible in my opinion). :oP


Japanese Brown Curry from a Box!
Makes a giant pot.
  • 1 Box Sauce Mix (preferably Vermont Curry) ~ 8.8oz size (large box)
  • 1.5 cup of cubed chicken (or beef or pork, but I've only tried chicken before)
  • 1/2 a large onion or 1-2 medium onions
  • 3-4 medium potatoes
  • 1-2 medium carrots
  • Cooked rice
  1. Cut meat, onions, carrot and potatoes into bite-size pieces. Sauté in saucepan until lightly browned. Add 5-3/4 cups water (if using large box) and bring to boil. Cook over low to medium heat about 20 minutes, or until tender.
  2. Remove from heat. Break curry sauce mix into pieces and add to saucepan.
  3. Cook over low heat about 20 minutes, or until curry thickens. Serve over cooked rice.
Note: The large box says it's 12 servings. (But I think it feeds more like.... 4 really hungry people, possibly to 6. Maybe the Japanese are conservative eaters. haha.) When using a half packet, please add half the amount of the ingredients mentioned and 3-1/2 cups of of water.

This was a staple for feeding friends in college.  All.  The. Time.  :)

Have you made Japanese Brown Curry from a box before?  What's your favorite brand/flavor?
                           

Thursday, January 10, 2013

Chocolate Chip Muffins

Here are the chocolate chip muffins I mentioned yesterday. For some reason, I stated on Facebook that they were the first muffins I've baked from scratch. Then I found out I had made Chocolate Chocolate Chip Muffins before!  :oP
 
Do you like the new oven mitt Tim got me for Christmas?  :)
 
Chocolate Chip Muffins
Adapted from allrecipies.com 
(I made some adjustments based on the comments/feedback people posted on the original recipe.)
 
Makes 12 muffins.
2 cups all-purpose flour


Wednesday, January 9, 2013

Meals for new parents

My BFF just had her first kid!  So I've been learning about cooking meals for new parents.  Though I'm beginning to think it's really just my excuse to go over there to hold little Sammy (short for Samuel).  :)

Hello Sammy!!!

 Last Saturday we brought over enchiladas to share with them, then a Mexican rice casserole for later, chocolate chip muffins, and cinnamon buns!  From the last time some friends had a baby in Boston, I learned (from reading blogs) that new parents often receive many freezable meals like lasagna and casseroles, but don't have things to eat for breakfast!  Since then I've tried to include muffins in addition to bringing over a meal.  In this case I happen to know the dad loves cinnamon rolls, so I grabbed a tube of that at the grocery store.  The muffins I made from scratch and will feature tomorrow!

We went Pillsbury on this one!

Chocolate Chip Muffin!

We got a Costco rotisserie chicken that day and put it to good use in the enchiladas and Mexican rice casserole.  The Mexican rice casserole is one of my favorites to make because it's so easy.  I liken it to Mexican fried rice, without any cooking.  (Just mixing and baking!) 

The recipe is from Sugarcrafter's "Mexican Chicken and Rice Bake"!  (Sorry no pictures.)  She includes a bunch of cheeses I usually don't have, so I usually adapt it to what I have on hand.

So here's my version, adapted from Sugarcrafter:

  • 1 1/2 cup chicken breast, cooked and shredded
  • 4  cooked white rice
  • 1 can sweet corn, drained
  • 1 can black beans, drained
  • 1 can diced tomatoes (or dice up a fresh one)
  • 1 tsp ground cilantro
  • 1/2 cup fat free sour cream
  • 1/2 to 1 cup grated cheddar cheese (depending on how cheesy you want it)
  • 1/2 cup grated mozzarella cheese (sometimes I forget this one if we don't have any)
  • Extra cheddar cheese and fresh cilantro, for topping

  • Preheat the oven to 350 degrees.  Add all the ingredients together, except for the last line (extra cheddar cheese and fresh cilantro), in a large bowl.  Transfer into a greased 9x13 pan.  Put extra cheddar cheese on top and then pop it into the oven!  Bake for ~20 minutes or until it's warmed through.

    It makes for fabulous leftovers since it's a pile of stuff all mixed together already anyway.  :)  One issue we found was that if you make it for new parents or put it unbaked in the fridge (overnight) before baking, it may dry out a bit (rice soaks up the sour cream/liquids?)  So you may want to have some extra sour cream handy and/or hot sauce!  Sometimes I throw in some Tapitio Hot Sauce in while I'm mixing it or if it's with others and someone might not eat spicy, I just add it to my plate. 

    If you're cooking for new parents or other people, make sure to check whether they can eat spicy, have certain ingredients they don't like, or if they're allergic to any food items!

    Have you cooked for new parents?  What are some favorite new parents you've made or have received?  Or have recipes that freeze well?  Please share!
                                                              

    Saturday, May 5, 2012

    Earl Grey Tea Cookies

    Yesterday we hosted a "Pride & Prejudice: Tea & Crumpets" tea party with our community group (aka Bible study). On a Friday night. :oP It was actually all Tim's idea. No kidding. :)

    It was fabulous! People brought the yummiest desserts! I learned what crumpets are... English muffins! Or as wiki puts it, "a savory griddle cake." And that didn't seem very fun at 7:30pm on a Friday night, so we went with cookies and cakes and scones and other lovelies. :)

    The spread! Tartlets, chocolate cake balls, cheesy scones, rice krispy treats, digestives!, coffee cake, and cookies. And tea of course!

    Earl Grey Tea cookies

    I made Trader Joe's Cinnamon Crumb Cake (so easy, so good!) and Earl Grey Tea Cookies! The tea cookies were a big hit and I was quite happy by how they turned out. Except they were a bit salty. And I just realized I had used salted butter instead of unsalted. Which explains everything. Which is great because that means when I make them correctly they will taste even better!!!

     
    (Taken with Instagram)

    Earl Grey Tea Cookies (by theKitchn)

    1 cup all purpose flour
    1/4 cup sugar
    1/4 cup confectioners' sugar
    1 tablespoon Earl Grey tea leaves*
    1/4 teaspoon salt
    1/2 teaspoon vanilla
    1 teaspoon water
    1/2 cup unsalted butter

    Preheat oven to 375°F. Pulse together all the dry ingredients in a food processor until the tea leaves are pulverized.

    Add vanilla, water, and butter. Pulse together until a dough is formed. Form the dough into a log onto a piece of wax or parchment paper. Wrap the paper around and roll the log smooth. Freeze now, or chill for at least 30 minutes.

    When chilled, slice the log into 1/3 inch thick pieces. Place on baking sheets and bake until the edges are just brown, about 12 minutes. Let cool on sheets for 5 minutes, then transfer to wire racks.
    Makes two dozen.

    *Note: theKitchn said they got better flavor from ripping open teabags for the tea leaves than from buying more expensive loose leaf. I've only made this once, with Twinings Earl Grey Tea bags, so I don't have a comparison but I thought it turned out great with the tea bags.
    -----------------------------------------------------------------

    I am quite excited to try this with other teas... green tea... chai tea... oh the possibli-teas! heh heh heh. :D

    What kind of tea cookies are your favorite? Or if you haven't tried any, what flavor do you think you'd like?
                    

    Friday, May 4, 2012

    Chocolate Chocolate-Chip Muffins

    I was all ready to post this but then I was too busy to pull pictures off my camera so this is a bit late! But here goes the first time I try making muffins.

    Up in these New England parts, there is a state-wide/civic holiday called Patriots' Day (this year it fell on April 16), which commemorates the anniversary of the Battles of Lexington and Concord (the first battles of the American Revolutionary War. However, because *I think* my org gets Lunar New Year day off... we don't get Patriots' Day. :(

    So I decided some chocolate chocolate-chip muffins were in order to start the week off while everyone else will be enjoying their day off (and/or running the Boston Marathon!)


    In blog-speak: the cast of characters!


    Mix the dry ingredients together, the wet together, then mix them both together!


    Then pour into your lined muffin pan


    (This one taken with Instagram)


    Chocolate Chocolate-Chip Muffins (from the Food Network, Nigella Lawson)
    (Never heard of her or seen her show!)

    Ingredients
    • 1 3/4 cups all-purpose flour
    • 2 teaspoons baking powder
    • 1/2 teaspoon baking soda
    • 2 tablespoons best quality cocoa powder
    • 3/4 cup superfine sugar*
    • 3/4 cup semisweet chocolate chips, plus 1/4 cup for sprinkling
    • 1 cup milk
    • 1/3 cup plus 2 teaspoons vegetable oil
    • 1 egg
    • 1 teaspoon pure vanilla extract

    * I didn't know what superfine sugar was (it's exactly what it sounds like), so I put in regular granulated sugar. Though some further research/googling AFTER I stuck the muffins into the oven... you can make supefine sugar by putting regular graduated sugar in a food processor.


    Directions

    Line muffin pan with baking/paper cups.

    Preheat the oven to 400 degrees F.

    Put the flour, baking powder, baking soda, cocoa, sugar, and 3/4 cup of the chocolate chips into a large bowl. Pour all the liquid ingredients into a measuring cup. Mix the dry and wet ingredients together. (Nigella says a lumpy batter makes the best muffins.) Spoon into the prepared muffin cups. Sprinkle the remaining 1/4 cup chocolate chips on top and then bake for 15-20 minutes or until the muffins are dark, risen and springy. (Make sure to check them between 15 and 20 minutes.)
    --------------------------------------------

    I thought they turned out okay.  I don't know why but I always get slightly coned shaped muffins!  I think it's because I tend to fill them more than I should.  :oT  (There are only 12 muffin slots so it's not like I can squeeze an extra one like I can on a cookie sheet for cookies!)  It was also unfortunate the first chocolate in "Chocolate Chocolate-Chip Muffins" didn't really live up to its chocolatey-ness.  The cocoa powder made them brown but it didn't really taste like a chocolate muffin.  They were also kind of... not sweet enough but it's most likely totally because I didn't use "superfine sugar."  They weren't hard at all and I think I'll have to try making muffins again sometime!

    What are your favorite kinds of muffins?
                        

    Thursday, March 22, 2012

    I AM FAMOUS

    This will be a sort of blog post continuum... where I link to a post that links to my post that links to a post.  I am also a dork.

    Anyway.  If you didn't know.

    I. AM. FAMOUS.

    See here:  Cooking with Friends: Kickerdoodles


    I. AM. ALVINA-CHOMPS. Hahah.

    It's like the most amazing post about kickdoodles that puts my post to bordom and shame. Though mostly just bordom. :D

    Penga is amaaazingly creative and so very entertaining.


    Visit her post for to view the entire story of Penga-Tamama and Alvina-Chomp making kickerdoodles!
                           

    Thursday, March 15, 2012

    Kickerdoodles

    It's been sooooo long!  >_<  Lots to blog about but I never seem to find the time to!  But today I decided to get a post in on my new wrangled idea.  :D

    So it was our turn to bring snacks to Bible study and I decided to make maple snickerdoodles.  They were recommended by my friend Abby and from Lovin' the Oven!  This is a FANTASTIC recipe.  I've gotten rave reviews about it.

    A few months ago, I tried another snickerdoodle recipe from Lovin' the Oven and randomly (possibly with Tim's help) got the idea while rolling the dough in cinnamon and sugar, to roll some in cinnamon and sugar + cayenne pepper!  They had a bit of a kick, so I came to name them KICKERDOODLES.

    This shall be patented/copyrighted/licensed soon!  :oP

    The Kickerdoodle
    (It basically looks like a snickedoodle with some red dots)


    I made half the batch normal for my office and half the batch kickerdoodles for my collesague/friend who likes all things hot and spicy, and she loved them!  She thought they were only a little tingly, so for the hot and spicy lovin' folks, you might have to kick it up a few notches to compensate for their burnt, shot out, over spiced tongues.  :oP

    I made them exactly like the maple snickerdoodle recipe but in addition to the two parts sugar to one part cinnamon, I added one part cayenne pepper.  You can of course add less or more.  Though if you don't add enough, you probably won't be able to taste it (unless you're super sensitive to spicy things).  It's very, very easy extra step at the end to pack a punch.  And cayenne pepper in a cookie is kinda fun, zany idea.  :)  [thinkoutsidethebox]


    KICKERDOODLES  (Adapted from Maple Snickerdoodles by Lovin' the Oven)

    •2 cups all-purpose flour
    •1 1/2 teaspoon baking powder
    •1/4 teaspoon baking soda
    •1/2 teaspoon cream of tartar
    •1 1/2 teaspoon ground cinnamon
    •1/2 cup salted butter (or you can use unsalted and add about 1/4 tsp salt)
    •1 cup granulated sugar
    •3 tablespoon real maple syrup
    •1 egg
    •2 parts sugar to 1 part cinnamon and 1 part cayenne pepper


    1. In a medium bowl, sift together flour, baking powder, baking soda, cinnamon, cream of tartar, and salt.

    2. In a large bowl, cream the butter and 1 cup sugar until light and fluffy. Beat in the maple syrup and egg until combined. Add dry ingredients. Beat until just mixed.

    3. Refrigerate dough for 30 minutes to an hour (the longer the better)

    4. Preheat oven to 350F.

    5. Roll dough into 1 inch balls. Roll each ball in the sugar/cinnamon/cayenne pepper mixture. Arrange balls on cookie sheets, 2 inches apart.

    6. Bake until tops are crackly, about 9-12 minutes. Remove from oven and leave cookies on sheets to cool slightly, about 2 minutes. Transfer cookies to wire rack to cool completely.

    If you make 'em, lemme know how you like them!
                             

    Monday, July 11, 2011

    Best of Betty Crocker 2011!

    It was only this past January I posted Best of Betty Crocker 2010 recipes, but now 2011 is out!  Well, at least summer and spring.  I guess fall and winter don't yield as many cute, colorful recipes!  (Or... just that fall and winter 2011 haven't happened yet.  :D)  I should probably be less of a slacker and share some recipes I've been using lately!  Especially the dessert stuff!

    Pages 1-11

    Pages 12-23

    Hope you find THE RECIPES useful!
                                                                

    Monday, January 3, 2011

    Best of Betty Crocker 2010!

    Blogger's picture uploader is being lame again, so I have resorted to Penga's recommendation of using Photobucket. Which I forgot my username and password to (since I haven't used it since them LiveJournal days -- woot woot!), so I had to dig around my email for the username and make up a new password!  All that trouble for this little post!


    Photobucket


    Just wanted to share my latest recipe find!  Best of Betty Crocker 2010 recipes in a sweet little PDF that you can view and download HERE

    What's in it?  Well, take a look!  Catagorized by seasons!


    Photobucket

    Isn't that the cutest font (for the seasons)? 
    And "holiday" sounds less depressing than "winter."  :oP

    I've already made note of the few I want to try!  :]  Enjoy!
                      

    Wednesday, December 1, 2010

    the costco way!

    Tim and I joke I was more excited to get our Costco membership than getting married.  Which by the way, we have been for SIX MONTHS as of yesterday!  :]  Married that is.  It's kind of crazy that it has seemed so long (in a good way! haha) yet so short.  :]

    Anyway, last weekend (after Thanksgiving) Costco gave away complimentary copies of their annual cookbook!  There are a ton of recipes under the categories of breafast, appetizers, beverages, salads and soups, side dishes, Chef's choice, entrees, and desserts!  All the ingrediants are things you can find at Costco!


    My dad texted me about the free book like... Friday evening and we were too busy lazy to go to Costco that weekend.  He said I could have their copy.  :-P  BUT!  It is also ONLINE!  In a handy dandy PDF!  As well as their past NINE years of cookbooks.  :]

    Here is the link to past Costco cookbooks PDFS  (Scroll down a little, to the left)

    For some reason, the links on that page get all scrunched up at the bottom so the last cookbook I'm able to click on is 2004.  So incase you also have this problem and want 2002 and 2003, here is the link to some person's blog that has them all!  (Scroll to bottom of post)

    Your recipe collection has now expanded a bajillion fold.  :]
                                    

    Tuesday, November 9, 2010

    Chicken Pot Pie

    Helloooo.  This is my second try at making chicken pot pie and I think it turned out the same but better.  :-P  There was hopefully a little bit of improvement in sort of knowing what I was doing.

    EAT ME.


    I basically used this Chicken Pot Pie recipe from Pillsbury and halved it.  And used a different baking dish.  (The recipe was for individual pies so they used 10-oz ramekins.)  I thought it'd be easier so use some dish, so I used a Pyrex pie plate.

    Season your chicken and cook it!  I think I put some pepper, some onion powder, and some apple cider vinegar.

    So I kinda didn't take pictures of the newly-improved-butter-flour-goop-ness part... but it's in the instructions.  :-P  Combine all your ingrediants and simmer until it bubbles thick.

    Spread evenly in your baking dish of choice.

    Open some Pillsbury Grands Flaky Layers Biscuits!  *POP!* Or... some other variation of Grands or the store brand.

    Distribute biscuits on top!  I split a fifth biscuirt to fill in the cracks.  Then shove into the over at 350° and bake for 20-ish minutes or until the biscuits are a golden brown.  (Everything but the biscuits should be cooked and basically edible already.)

    SEE!  :-D  All finished.  Pretty easy.

    
    Chicken Pot Pie
    4 servings (Half of orginal recipe)

    2 tablespoon butter
    2 table + 2 teaspoon all-purpose flour
    Dash of pepper
    1/2 can (5 1/4 oz) condensed chicken broth
    1/4 cup + 2 tablespoons milk
    1 cup cubed cooked chicken
    2 table + 2 teaspoon chopped onion
    1/2 cup frozen peas
    1/2 cup sliced carrots
    1/2+ can Pillsbury® Grands!® Flaky Layers refrigerated original biscuits
    Additional milk, if desired

    Heat oven to 350°F. Grease baking dish.

    In 10-inch skillet, melt butter; stir in flour and pepper. Cook about 1 minute, stirring constantly, until smooth and bubbly. Gradually stir in broth and 3/4 cup milk; cook until mixture boils and thickens, stirring constantly. Add chicken, onion, mushrooms, peas and carrots; cook until hot and bubbly.

    Spoon mixture evenly into ramekins. Separate dough into 8 biscuits. Press each to make 4 1/2-inch round. Place biscuit rounds on tops of filled ramekins. Cut slits in biscuit tops. Brush biscuit tops with additional milk. Sprinkle with sesame seed.

    Bake 17 to 20 minutes or until biscuits are golden brown.
           

    Tuesday, November 2, 2010

    Bell Pepper Pesto Tortellini

    Bell Papper Pesto Tortellini tossed in garlic and red chilli pepper flakes-infused EVOO is the proper name, but it seemed too long for this blog title.  :-P  But basically... that is what it is!  I'm kind of proud of this recipe since I came up with it all on my own and it was really tasty!  It's so suuuuper easy... it might not count as an orginal recipe.  O_O

    First, run to Trader Joe's and pick up a bag or two or three of their dry tortellini.  I accidently discovered them when browsing the aisles.  (So dangerous!)  I got the pesto filled ones... though only cause I couldn't find any of their three-cheese ones on the shelf.  :(  I suuuuppose you could use fresh/real tortellini but mini ones that have shelf life is like... so much better.  Especially for a GREAT quick, ahhh-I-have-nothing-to-cook! emergency, meatless (nothing to defrost/thaw) meal.  :]  Plus, it was only $3 for the pesto one ($2 or $2.50 for the three-cheese one, I believe) and I used it for two meals.

    Trader Joe's Tortellini with Pesto Filling

    Boil water, cook tortellinis according to instructions.  Remember (something I don't...) the cute little mini tortillinis will EXPAND.  :-P  So about half the bag (1/2 lb) was good enough for the TWO of us for one meal.  (Though it might help to have a side dish or some garlic bread.)

    Then dice up (little square bits) some red and green bell peppers.  (Both mostly for color.)

    Add EVOO to a pot, enough to toss the pasta in (not for it to swim in).  Don't put too much oil and keep the heat low (about a simmer) since you don't want to fry your tortellinis or have oil speckle/splatter on you.

    Add garlic and red chilli flakes (optional but so delicious if you can handle a little spicy) and let simmer for about 5-7 minutes.  You can also throw whatever spices you want in.  :oD

    Tip: If you don't own or want to buy red chilli flakes, save some little packets from the next time you order a pizza  :-P

    Throw in the bell peppers and let that simmer for 10-15 minutes, or until you decide it's ready!  :oP  Mostly let the garlic and chilli flakes infuse their flavors into the oil, and to soften the bell peppers (and get good flavor into them too!)

    Red and green bell peppers chilling out (though I'm sure it was very hot) aka simmering in EVOO.

    Hopefully by this point, your tortellinis are ready, drained and waiting!  Try not to overcook them since they kinda start to unravel and the filling falls out.

    Combine the tortellini and bell peppers with EVOO.  Toss.  Eat.  Enjoy!  :-D

    Bell Pepper EVOO Pesto Tortellini!

    The above picture might look a little dry since all the oil probably dripped underneath the tortellinis and... I might've started eating before I remembered to take a picture.  It.  Was.  Really.  Good.  If I can say that about something I cooked.  haha.  Easy peasy and delicious!

    I'm not good at the whole measuring bit (at least when I come up with recipes)... and good thing this one doesn't have too much of that... so I'll say... you should just do it.  As in... just make it up.  :oP  Or if you absolutely need some numbers for guidence... to prepare this dish for two people:

    - 1/2 lb TJ Tortellini w/ Pesto Filling (adjust accordingly if you're using bigger ones or another kind)
    - Half a green bell pepper, diced
    - Half a red bell pepper, diced
    - 1/3 cup of EVOO
    - 3-4 cloves of minced garlic
    - FATTY pinch of red chilli flakes, maybe two  ;]

    You could probably include chicken or other veggies to bulk it up.  Like I  mentioned before, I definitely suggest having some garlic bread to go with it.  Extra deliciousness.  :-D
               
    Related Posts Plugin for WordPress, Blogger...